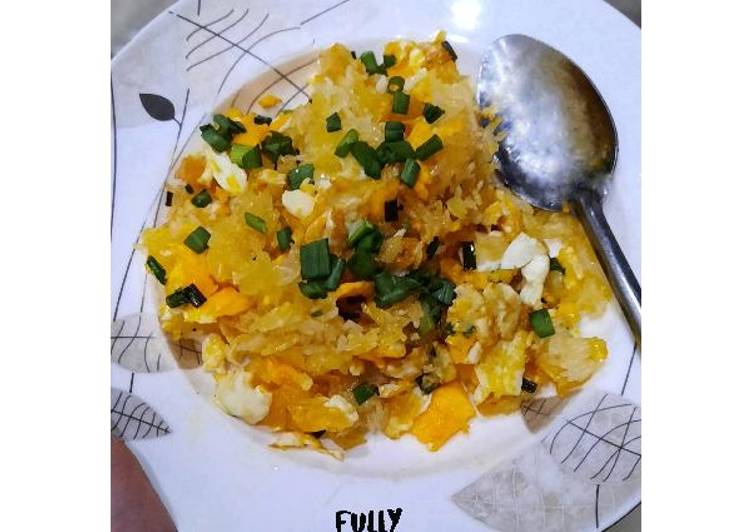
Hello everybody, I hope you are having an amazing day today. Today, I will show you a way to prepare a distinctive dish, crispy egg fried rice for crunchy lovers | fully tummies. One of my favorites. This time, I will make it a little bit unique. This is gonna smell and look delicious. Fully Tummies** is one of the most popular of recent trending foods on earth. It is easy, it is quick, it tastes yummy. It is appreciated by millions every day. Crispy Egg Fried Rice for Crunchy Lovers
Homemade Chicken Nuggets Recipe by Tiffin Box How To Make Crispy Nuggets for kids lunch box. Homemade Onion Rings - Super Crispy Easy and Delicious.
Steps to Prepare Crispy Egg Fried Rice for Crunchy Lovers | Fully Tummies
To begin with this recipe, we have to first prepare a few components. You can have crispy egg fried rice for crunchy lovers | fully tummies using 6 ingredients and 7 steps. Here is how you can achieve that.
Ingredients
The ingredients needed to make Crispy Egg Fried Rice for Crunchy Lovers | Fully Tummies:
- Make ready Left-over Rice
- Prepare Butter
- Get Egg
- Get Shallot
- Make ready Green Onion
- Take Fish sauce
Make stir fries and rice even more flavorful when you cook and top with La Choy Soy Sauce. La Choy Fortune Cookies are deliciously crispy with a fun message inside. Leftover fried chicken and white rice is tossed together with stir-fried onions and tamari, hot sauce and Worcestershire sauce for a simple and DELICIOUS fried rice recipe. Crispy rice has a revered place in many cultures.
Instructions
Instructions to make Crispy Egg Fried Rice for Crunchy Lovers | Fully Tummies:
- Heat up the pan then add in 1 spoon of vegetable and 1 spoon of butter :3
- Add in the rice, mix well with the butter then spread it evenly on the pan :3
- While waiting for the rice to be crispy, Dice small the shallot and the green onion :3
- You can check whether the rice is crispy or not by shaking the pan. If the rice is crispy, it will easily be running on the pan. Use the spoon to divide it into bite-size and push it aside so that you have space to add in the egg and the diced shallot and green onion. Give the egg and the condiments a little mix :3
- When you smell the fragrant of the condiments you should mix rice with it and add in a spoon of fish sauce :3
- When the egg is cooked, turn off the stove and plate the dish :3
- Don't forget to like share and subscribe or channel: Fully Tummies to support us releasing more videos and recipes :3 - - Also follow us on Instagram and Twitter: @fullytummies
These rice cakes are cooked with leftover Japanese steamed rice. It's simple but makes a great snack or a delicious side dish to meat or fish. Repeat the procedure with the rest of the dough. Make sure the heat is neither low nor high. Herby noodles, chile oil and crisp tofu come together in this spicy, filling bowl that will disappear before you know it But the component parts are just as valuable on their own: Make crisp baked tofu once, and you may never pan-fry cubes again Make a scallion-basil paste on your cutting board, and forget.
As simple as that Steps to Make Crispy Egg Fried Rice for Crunchy Lovers | Fully Tummies
So that is going to wrap this up with this special food crispy egg fried rice for crunchy lovers | fully tummies recipe. Thank you very much for your time. I am confident that you can make this at home. There is gonna be more interesting food in home recipes coming up. Don’t forget to save this page in your browser, and share it to your loved ones, friends and colleague. Thank you for reading. Go on get cooking!
Print this page