Hey everyone, it’s Louise, welcome to our recipe page. Today, I’m gonna show you how to prepare a distinctive dish, homemade sauerkraut (no crock required). It is one of my favorites. For mine, I am going to make it a little bit unique. This is gonna smell and look delicious.
Homemade Sauerkraut (no crock required) is one of the most favored of current trending meals in the world. It is enjoyed by millions daily. It is easy, it’s quick, it tastes delicious. Homemade Sauerkraut (no crock required) is something which I have loved my entire life. They are nice and they look wonderful.
How to Make Homemade Sauerkraut (no crock required)
To begin with this particular recipe, we must first prepare a few components. You can cook homemade sauerkraut (no crock required) using 3 ingredients and 18 steps. Here is how you cook that.
Ingredients
The ingredients needed to make Homemade Sauerkraut (no crock required):
- Prepare 1 cabbage
- Get 1 salt
- Make ready 1 mustard seed, optional
Instructions
Steps to make Homemade Sauerkraut (no crock required):
- Chop the cabbage. I do it by hand to a coarse chop, but you can use a food processor to shred it fine if you prefer.
- Put the cabbage in a large non-metal bowl.
- Add about 1 tablespoon of canning salt per pound of shredded cabbage.
- Mix the salt and cabbage with your hands for a few minutes, until the cabbage starts to make its own liquid and starts to turn translucent.
- Let the salted cabbage sit for about 30 minutes, then mix again.
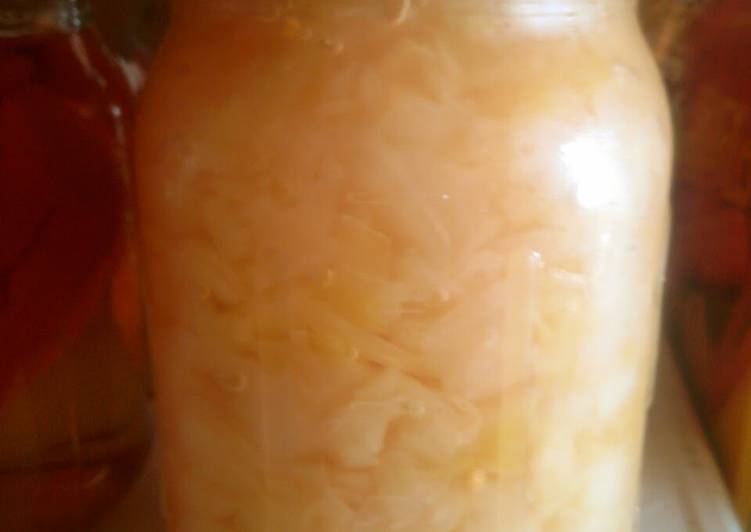
- Pack the cabbage into glass jars, pressing it down with a wooden spoon and adding more until it reaches the neck of the jar.
- Make salted water by combining 1 cup of distilled water (I use previously boiled water from the kettle, spring water is also fine) with 1 tablespoon of pickling salt. Stir until the salt is dissolved.
- Pour the salt water over the cabbage mixture to the very top of the jar, and top with a metal canning lid.
- Put the metal ring on the jar loosely. You want water to be able to escape as the cabbage ferments.
- Place the jar(s) in a basin or baking pan with high sides.
- Place the jars somewhere where the temperature is around 65-75 degrees F. They will need to sit here for about two weeks.
- Keep an eye on the jars. As the cabbage ferments, it will start to bubble, pushing liquid out of the jar and into the basin.
- Check the liquid daily. If the level falls below the rim of the jar, add more salt water and replace the lid. Empty the container ever couple of days to avoid attracting fruit flies.
- After about two weeks, you should notice that the water level has stopped dropping.
- Screw on the lids snugly and place the jars in the refrigerator. Once fermented, it will keep for a while (months? I can't say for sure, I've never had it last that long!)
- You can eat the sauerkraut straight out of the jar, or cook it before serving. I usually cook pork chops or bratwurst in the sauerkraut in a cast iron skillet or dutch oven.
- If your sauerkraut is saltier than you like, rinse it before eating.
- Note: A little white mold on the top of your fermenting sauerkraut is harmless – just scrape it away if you see it and top with salted water. You can avoid white mold by being diligent about keeping the water level topped off.
As simple as that Guide to Prepare Homemade Sauerkraut (no crock required)
So that is going to wrap it up for this special food homemade sauerkraut (no crock required) recipe. Thank you very much for your time. I am sure that you will make this at home. There’s gonna be more interesting food in home recipes coming up. Remember to bookmark this page in your browser, and share it to your loved ones, colleague and friends. Thanks again for reading. Go on get cooking!
Print this page